
The Big Picture: Why Do We Need Forms?
Imagine the internet without forms. You couldn't log in, sign up for a newsletter, buy a product, leave a comment, or even use a search engine. Forms are the primary way a website collects information from a user.
Think of an HTML form as the digital equivalent of a paper form, like a job application or a survey. It's a container for a collection of different types of fields (text boxes, checkboxes, etc.) that users can fill out. When they're done, they hit a "Submit" button, and that data is sent to a server for processing.
The Foundation: The <form> Element
Before you can have any input fields, you need to wrap them in a <form> tag. This element is the main container that tells the browser, "Everything inside here is part of one single form and should be submitted together."
The <form> tag itself has two crucial attributes:
- action: This tells the browser where to send the form data when it's submitted. The value is a URL, which points to a server-side script (e.g., in a language like PHP, Python, or Node.js) that will process the information.
- method: This specifies how to send the data. The two most common methods are:
- GET: Appends the form data to the URL. It's visible in the address bar and is good for simple, non-sensitive things like search queries.
- POST: Sends the form data in the body of the HTTP request. It's more secure as the data is not visible in the URL, making it essential for things like login forms or personal information.
<form action="/submit-your-data-here" method="POST">
  <!-- All your input fields will go here -->
</form>
The Most Important Partnership: <label> and id
This is the most critical concept for creating user-friendly and accessible forms. A <label> is a text description for an input field.
Why is it so important?
- Usability: When you correctly connect a
<label>to an input, a user can click on the text of the label to focus on or select the input field. For tiny radio buttons or checkboxes, this makes the form much easier to use. - Accessibility: Screen readers, used by visually impaired users, read the
<label>text out loud when the user focuses on an input. Without a label, the user would just hear "checkbox" or "text field" and have no idea what information they are supposed to enter.
How do you connect them? You give the input field a unique id attribute. Then, you give the <label> a for attribute that has the exact same value as the input's id.
<!-- CORRECT WAY -->
<label for="firstName">First Name:</label>
<input type="text" id="firstName" name="user_first_name">
Output:

Now, clicking on the text "First Name:" will immediately place the cursor inside the text box.
Part 1: Text-Based Inputs
These are for collecting freeform text from the user.
The Classic Text Box: <input type="text">
This is your standard, single-line text input field. Use it for short, single-line pieces of information like names, usernames, or subjects.
Key Attributes:
type="text": Defines it as a text box.id="...": A unique identifier to be used by the<label>.name="...": Crucial. This is the name of the data when it's sent to the server. The server will see name=value.placeholder="...": Displays greyed-out example text inside the field, which disappears when the user starts typing. It's a hint, not a label.required: A boolean attribute. Simply adding the word required to the tag means the user cannot submit the form if this field is empty.
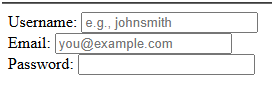
<form action="/signup" method="POST">
  <div>
    <label for="username">Username:</label>
    <input type="text" id="username" name="username" placeholder="e.g., johnsmith" required>
  </div>
  <div>
    <label for="email">Email:</label>
    <input type="email" id="email" name="user_email" placeholder="you@example.com">
    <!-- Note: type="email" provides browser validation for email format! -->
  </div>
  <div>
    <label for="password">Password:</label>
    <input type="password" id="password" name="user_password" required>
    <!-- Note: type="password" automatically hides the characters as you type -->
  </div>
</form>
Output:
Part 2: Making Choices - Radio Buttons and Checkboxes
These are for when you want the user to select from a predefined set of options.
Radio Buttons: <input type="radio">
Use radio buttons when the user must select only one option from a list. You create a group of radio buttons by giving them all the exact same name attribute. The browser understands that all inputs with the same name belong to a single-choice group.
Key Attributes:
name="...": The shared name that groups the radio buttons.id="...": A unique ID for each individual radio button, for its label.value="...": This is the actual data value that will be sent to the server if that option is selected. This is invisible to the user but essential for the server.checked: Add this word to one of the radio buttons to make it the default selected option when the page loads.
<h3>What is your skill level? (Choose one)</h3>
<form action="/survey" method="POST">
  <div>
    <input type="radio" id="levelBeginner" name="skill_level" value="beginner" checked>
    <label for="levelBeginner">Beginner</label>
  </div>
  <div>
    <input type="radio" id="levelIntermediate" name="skill_level" value="intermediate">
    <label for="levelIntermediate">Intermediate</label>
  </div>
  <div>
    <input type="radio" id="levelAdvanced" name="skill_level" value="advanced">
    <label for="levelAdvanced">Advanced</label>
  </div>
</form>
Output:
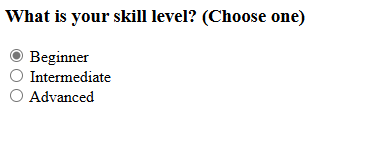
Explanation: In this example, if the user selects "Intermediate" and submits, the data sent to the server will be skill_level=intermediate. The user only sees the label text, but the server gets the clean value. The checked attribute on "Beginner" means it will be pre-selected.
Checkboxes: <input type="checkbox">
Use checkboxes when the user can select zero, one, or multiple options from a list. Similar to radio buttons, you can group related checkboxes with the same name attribute. This is helpful for the server to know they all belong to the same question.
<h3>Which topics are you interested in? (Check all that apply)</h3>
<form action="/interests" method="POST">
  <div>
    <input type="checkbox" id="topicHTML" name="interests" value="html">
    <label for="topicHTML">HTML</label>
  </div>
  <div>
    <input type="checkbox" id="topicCSS" name="interests" value="css" checked>
    <label for="topicCSS">CSS</label>
  </div>
  <div>
    <input type="checkbox" id="topicJS" name="interests" value="javascript" checked>
    <label for="topicJS">JavaScript</label>
  </div>
</form>
Output:
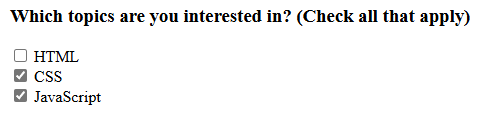
Explanation: If a user leaves "CSS" and "JavaScript" checked and submits, the browser might send the data as interests=css&interests=javascript. The server-side code will know to collect all values associated with the interests name.
Part 3: Selecting from Longer Lists
When you have too many options for radio buttons, it's time for a dropdown.
Dropdown Selection: <select> and <option>
This creates the classic dropdown menu. The <select> element is the container, and each individual choice inside it is an <option> element.
<form action="/profile" method="POST">
  <label for="country">Country:</label>
  <select id="country" name="user_country">
    <option value="">--Please choose an option--</option>
    <option value="usa">United States</option>
    <option value="can">Canada</option>
    <option value="uk" selected>United Kingdom</option>
    <option value="aus">Australia</option>
  </select>
</form>
Deep Explanation: The user sees "United Kingdom" pre-selected. If they don't change it and submit, the server receives user_country=uk. The first option with an empty value is a common trick to ensure the user makes an active choice.
The Suggestion Box: <input list="..."> and <datalist>
This is a clever hybrid. It looks like a regular text box, but when the user starts typing, it provides a list of pre-defined suggestions they can choose from. The user can either pick a suggestion or type their own custom value.
You connect them the same way you connect a label: the <datalist> gets a unique id, and the <input> gets a list attribute with the exact same value.
<form action="/search" method="GET">
  <label for="browserChoice">Choose your browser from the list:</label>
  <input list="browsers" id="browserChoice" name="browser">

  <datalist id="browsers">
    <option value="Chrome">
    <option value="Firefox">
    <option value="Safari">
    <option value="Edge">
    <option value="Opera">
  </datalist>
</form>
Deep Explanation: The user sees a text box. If they type "F", a dropdown will appear showing "Firefox". They can click it to autocomplete, or they could ignore it and type "Brave", which is a valid submission. This is great for when you want to guide the user but not strictly limit their choices like a <select> box does.
The Final Piece: Submitting the Form
A form is useless without a way to send the data.
The Submit Button
You have two primary ways to create a submit button. They both do the exact same thing: when clicked, they gather up all the data in the form and send it to the location specified in the form's action attribute.
Using <input>:
<input type="submit" value="Sign Up Now">Using <button> (Recommended):
<button type="submit">Register Account</button>This is more flexible because you can put other HTML elements (like icons or images) inside the <button> tags. It's the more modern and powerful approach.
By understanding these fundamental building blocks, you can now create rich, interactive forms to collect any kind of information you need from your users.