
LEARNING OUTCOME 3
VISUAL STUDIO IDE: Your Development Workstation
Visual Studio (VS) is a powerful Integrated Development Environment (IDE) from Microsoft, primarily designed for building applications on the Windows platform using .NET technologies (though it supports others too). It offers a comprehensive set of tools and functionalities to streamline the development process. Here's a breakdown of its key components:
-
TOOLBARS:
- Toolbars offer quick access icons for frequently used commands found in the menus (e.g., Save, Start Debugging, Build). They are customizable.
-
SOLUTION EXPLORER:
- This window displays a hierarchical tree view of your solution and its projects. It shows files (source code, resources), references, and dependencies. You use it to navigate, open files, add items, and manage the project structure.
-
Code Editor:
- The main area where you write and edit your source code. It features syntax highlighting, IntelliSense (code completion and parameter info), code navigation, refactoring tools, and error/warning indicators.
-
Properties Window:
- Displays the properties of the currently selected item (e.g., a UI control in the designer, a project file in Solution Explorer). Allows you to view and modify these properties.
-
Output Window:
- Shows messages from the build process (compilation results, errors, warnings) and can display output from debugging sessions or other tools.
-
Error List:
- Provides a structured list of errors, warnings, and messages generated during compilation or code analysis, often allowing you to double-click an item to navigate directly to the problematic code line.
-
Command Window / Terminal:
- Visual Studio often includes an integrated terminal (like PowerShell or Developer Command Prompt) allowing you to execute command-line tools (like Git commands, .NET CLI commands) directly within the IDE.
Additional Notes:
- The specific layout and available windows can vary based on the chosen profile (e.g., Web Development, General), the project type, and user customization.
- Visual Studio is highly extensible through a marketplace of extensions that add support for more languages, tools, and frameworks.
VISUAL STUDIO IDE: Weighing the Pros and Cons
Visual Studio is a popular IDE, but like any tool, it has its own set of advantages and disadvantages.
ADVANTAGES:
- Rich Feature Set: Comprehensive tools for editing, debugging, testing, building, and deployment across various languages and frameworks supported by Microsoft.
- Integration with Microsoft Ecosystem: Excellent integration with .NET, Azure cloud services, SQL Server databases, etc.
- Large Community & Resources: Extensive documentation, tutorials, forums, and a vast marketplace for extensions.
- Advanced Code Editing & IntelliSense: Powerful features like syntax highlighting, intelligent code completion, refactoring tools, and code analysis enhance productivity and code quality.
- Powerful Debugging Tools: Industry-leading debugger with features like breakpoints, step-through execution, variable inspection, call stack viewing, and memory analysis.
- Integrated Version Control: Built-in support for Git and Azure DevOps (formerly TFS) for seamless version management and collaboration.
- Extensibility: Customizable with numerous extensions to add specific functionalities.
- Visual Designers: Tools for visually designing UIs for Windows Forms, WPF, and other graphical applications.
DISADVANTAGES:
- Cost: While the Community edition is free and very capable for individuals and small teams/open-source, the Professional and Enterprise editions required for larger teams or specific advanced features have licensing costs.
- Resource Intensive: Can consume significant system resources (RAM, CPU), potentially leading to slower performance on older or lower-spec machines.
- Primarily Windows-Focused: While VS for Mac exists and .NET Core/ .NET 5+ are cross-platform, the primary Visual Studio IDE experience is richest and most complete on Windows. Development for other platforms might feel less native compared to platform-specific tools.
- Complexity & Learning Curve: The sheer number of features can be overwhelming for beginners.
- Potential Vendor Lock-In: Heavy reliance on specific VS features or Microsoft technologies might make migrating projects to different platforms or IDEs more challenging.
Visual Studio remains a top-tier IDE, especially for developers working within the Microsoft ecosystem (.NET, Windows, Azure). The free Community edition provides immense value. However, resource usage, cost for paid versions, and its Windows-centric nature are points to consider when choosing an IDE.
EVENT-DRIVEN PROGRAMMING (EDP)
Event-driven programming (EDP) is a programming paradigm where the flow of the program is determined by events—such as user actions (mouse clicks, key presses), sensor outputs, or messages from other programs/threads. Instead of following a linear sequence of commands, the program waits for events to occur and then executes specific code (event handlers) in response.
1. EVENTS:
- An event is a notification or signal sent by an object (the event source or publisher) to indicate that something significant has happened.
- In C#, events are members of a class declared using the `event` keyword, typically associated with a delegate type.
- Example: A `Button` class might have a `Click` event.
public class Button
{
  // Declare the event using the built-in EventHandler delegate
  public event EventHandler Click;

  // Method to raise the event (often protected and virtual)
  protected virtual void OnClick(EventArgs e)
  {
      // Check if there are any subscribers before raising
      Click?.Invoke(this, e);
  }

  // Simulate the action that triggers the event
   public void PerformClick()
   {
       Console.WriteLine("Button physically clicked...");
       OnClick(EventArgs.Empty); // Raise the Click event
   }
}
The `Button` class declares a `Click` event. The `PerformClick` method simulates the click and calls `OnClick`, which safely raises the event using `Click?.Invoke(...)`.
2. DELEGATES:
- A delegate is a type that represents references to methods with a specific parameter list and return type. Think of it as a type-safe function pointer.
- Events use delegates to define the required signature for their event handler methods.
- The most common delegate used for events is `System.EventHandler` (or `System.EventHandler
`).
// Definition of the standard EventHandler delegate
public delegate void EventHandler(object sender, EventArgs e);
This defines that any method handling an event using `EventHandler` must accept an `object` (the sender) and an `EventArgs` object (event data) and return `void`.
3. EVENT-DRIVEN PROGRAMMING (EDP) Implementation:
- In EDP, objects (subscribers) express interest in an event by attaching (subscribing) one or more of their methods (event handlers) to the event of another object (publisher).
- When the publisher raises the event, all subscribed event handlers are automatically executed.
- This creates a loose coupling: the publisher doesn't need to know anything about the subscribers, and vice-versa.
BENEFITS OF EVENT-DRIVEN PROGRAMMING:
- Responsiveness: Ideal for GUIs and interactive systems, allowing the application to react immediately to user input or system changes.
- Loose Coupling: Publishers and subscribers are independent, making the system more modular and easier to maintain and modify.
- Flexibility: Multiple subscribers can react to the same event, and a single object can subscribe to events from multiple publishers.
EVENT PUBLISHING, SUBSCRIBING, AND EVENT HANDLING
EVENT PUBLISHING (Raising an Event):
- The object that owns the event (the publisher) is responsible for raising it when the appropriate condition occurs.
- This is typically done within a method of the publisher class.
- Best practice involves creating a protected virtual method (e.g., `OnEventName`) that encapsulates the event raising logic. This allows derived classes to override how the event is raised or perform actions before/after raising it.
- The `?.Invoke()` syntax (null-conditional operator with `Invoke`) is crucial for safely raising the event only if there are subscribers attached, preventing a `NullReferenceException`.
// Inside the Button class from before:
protected virtual void OnClick(EventArgs e)
{
    EventHandler handler = Click; // Copy to local variable for thread safety
    handler?.Invoke(this, e); // Safely invoke subscribers
}

public void PerformClick()
{
   // ... logic to detect click ...
   OnClick(EventArgs.Empty); // Trigger the event raising method
}
EVENT SUBSCRIBING (Attaching a Handler):
- An object that wants to react to an event (the subscriber) needs to provide a method (the event handler) that matches the event's delegate signature.
- It then attaches this handler method to the publisher's event using the `+=` operator.
- An object can unsubscribe using the `-=` operator.
public class MyForm
{
    private Button _myButton;

    public MyForm()
    {
        _myButton = new Button();
        // Subscribe the HandleButtonClick method to the button's Click event
        _myButton.Click += HandleButtonClick;
    }

    // Event Handler method - must match EventHandler delegate signature
    private void HandleButtonClick(object sender, EventArgs e)
    {
        Console.WriteLine("The button was clicked! Responding in the form.");
        // Add logic here to update the form, etc.
    }

    // Example of how to unsubscribe (e.g., when the form is closing)
    public void Cleanup()
    {
         _myButton.Click -= HandleButtonClick;
    }
}
EVENT HANDLING:
- This is simply the execution of the subscribed event handler method(s) when the event is raised by the publisher.
- The code inside the handler method defines how the subscriber reacts to the event.
- The `sender` argument allows the handler to know which object raised the event (useful if one handler subscribes to multiple objects).
- The `EventArgs` argument (or a custom class derived from it) carries any specific data related to the event (e.g., mouse coordinates for a mouse click event).
GUI DEVELOPMENT PROCESS (Windows Forms Example)
Creating a Graphical User Interface (GUI) for applications that responds to user events is a core part of application development. Here's a typical process using C# with Windows Forms in Visual Studio:
-
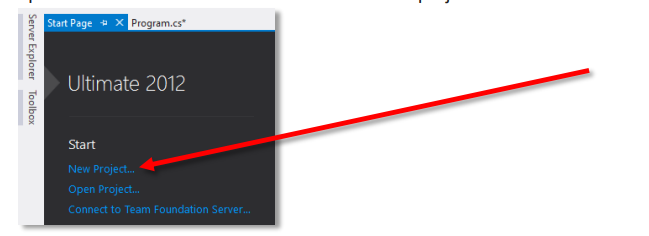
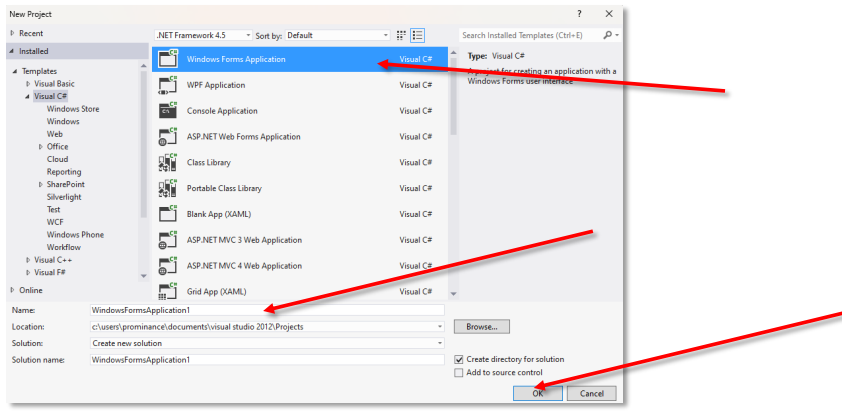
Create a New Windows Forms Application:
- Open Visual Studio.
- Go to `File > New > Project`.
- Search for and select "Windows Forms App (.NET Framework)" or "Windows Forms App" (for .NET Core/.NET 5+).
- Provide a project name and location, then click "Create".
- Visual Studio will generate a basic project with a default form (e.g., `Form1`).
-
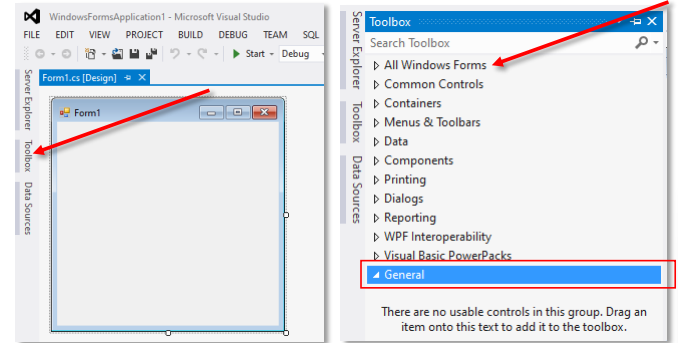
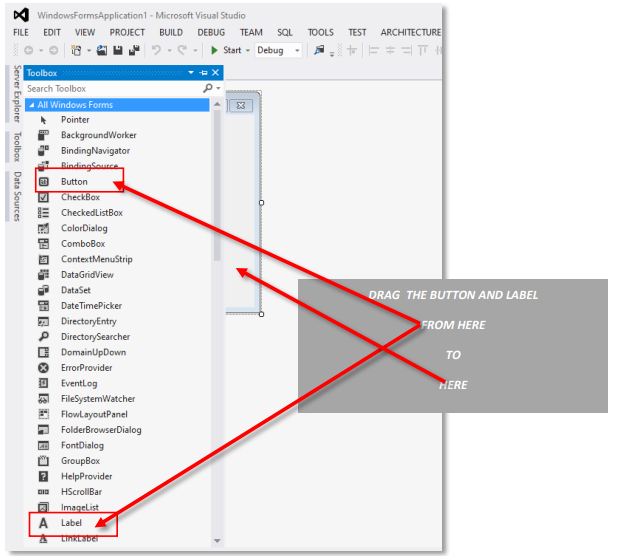
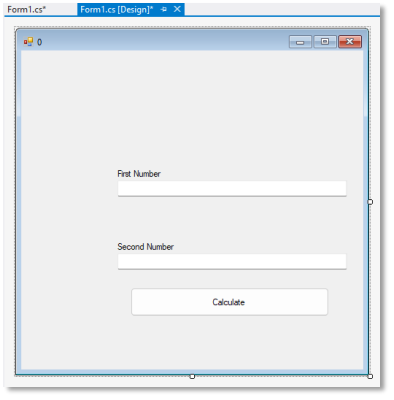
Design the User Interface (UI):
- Double-click the form file (e.g., `Form1.cs`) in the Solution Explorer to open the visual designer.
- Open the **Toolbox** (`View > Toolbox` or Ctrl+Alt+X).
- Drag and drop controls (like `Button`, `Label`, `TextBox`) from the Toolbox onto the form's design surface.
- Select controls on the form and use the **Properties** window (`View > Properties Window` or F4) to change their appearance and behavior (e.g., `Text`, `Name`, `Size`, `Location`, `Font`).
-
Write Event Handler Code:
- The easiest way to create an event handler for the most common event of a control (like a Button's `Click` event) is to **double-click the control** in the designer.
- Visual Studio automatically generates an event handler method stub in the form's code-behind file (`.cs`) and subscribes it to the event.
- Write the C# code inside this generated method that you want to execute when the event occurs (e.g., show a message box, update a label).
- You can also manually subscribe to other events using the Properties window (select the control, click the lightning bolt icon for events, double-click the desired event).


-
Compile and Run the Application:
- Press `F5` or click the "Start" button (usually a green triangle) in the toolbar to build and run your application.
- Interact with your UI elements to test if the event handlers work as expected.
Font Changes and Design Principles:
- Use the **Properties Window** to change the `Font` property of controls for consistent styling.
- Consider basic design principles:
- Clarity: Make controls and labels easy to understand.
- Consistency: Use similar styles, fonts, and layouts across your application.
- Feedback: Provide visual cues when actions occur (e.g., disabling buttons during processing).
- Simplicity: Avoid cluttering the interface.
Code Snippet (Example Button Click Event Handler):
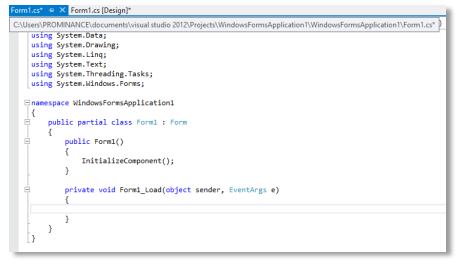
public partial class Form1 : Form
{
    public Form1()
    {
        InitializeComponent(); // Method from Form1.Designer.cs
    }

    private void button1_Click(object sender, EventArgs e)
    {
        // Code to execute when button1 is clicked
        MessageBox.Show("Button clicked!", "Message");
        // Example: Update a label's text
        // label1.Text = "You clicked the button!";
    }
}
INTEGRATING SOURCE CONTROL WITH VISUAL STUDIO: Branching, Merging, and Version Control
Visual Studio offers excellent integration with source control systems (SCS) like Git, allowing you to manage code versions, collaborate effectively, and track changes.
1. Setting Up Source Control:
- **Choose an SCS:** Git is the de facto standard.
- **Install Git:** If not already installed, download and install Git for your OS.
- **Initialize/Clone Repository:**
- **New Project:** When creating a new project in VS, you can often check an option like "Add to source control" or "Create Git repository".
- **Existing Project:** Open your solution, go to the Git menu (or `File > Add to Source Control`), and choose Git. This initializes a local repository.
- **Remote Repository:** To connect to a service like GitHub, Azure DevOps, or GitLab, use the Git menu or Team Explorer to clone an existing remote repository or push your local repository to a new remote one.
2. Version Control Basics (Committing Changes):
- As you make changes to your code, Visual Studio tracks them.
- Use the **Git Changes** window (`View > Git Changes` or usually docked) to see uncommitted changes.
- **Stage** the changes you want to include in the next snapshot (commit).
- Write a descriptive **commit message** explaining the changes.
- Click **Commit Staged** to save the snapshot locally.
- Use **Push** to upload your local commits to the remote repository (if connected).
- Use **Pull** to fetch and integrate changes made by others from the remote repository.
3. Branching:
- Branching creates an independent line of development. It's essential for working on new features or bug fixes without disrupting the main stable codebase (often the `main` or `master` branch).
- **Create a Branch:** In the Git Changes window or the status bar branch indicator, you can create a new branch (e.g., `feature/new-login-page`, `bugfix/issue-123`). Visual Studio typically switches you to the new branch automatically.
- Work on your task within this branch, making commits as needed.
4. Merging:
- Once work on a branch is complete and tested, you merge it back into the main branch (or another target branch).
- **Switch** back to the target branch (e.g., `main`).
- In the Git Changes window or Git menu, find the option to **Merge** the completed branch into the current one.
- Visual Studio will attempt the merge. If there are **conflicts** (changes in both branches affecting the same lines of code), VS provides tools to help you resolve them manually by choosing which changes to keep.
- After resolving conflicts (if any), complete the merge by committing the merge result.
- Push the updated main branch to the remote repository.
BENEFITS OF USING SOURCE CONTROL:
- Collaboration: Enables multiple developers to work concurrently.
- History Tracking: Provides a complete history of changes.
- Reversibility: Easily revert to previous working versions.
- Experimentation: Safely try out new ideas on branches without risk.
- Backup: Remote repositories serve as offsite backups.
PROJECT TYPES AND TEMPLATES IN VISUAL STUDIO
Visual Studio uses project templates to provide starting points for different kinds of applications.
Common Project Types:
- Console App: For text-based command-line applications. Simple structure, good for learning core C# and algorithms.
- Class Library: Creates reusable code libraries (.dll files) that can be referenced by other projects. Contains classes and logic but no direct executable entry point.
- Windows Forms App (WinForms): For building traditional Windows desktop applications with a GUI using a drag-and-drop designer. Mature technology.
- WPF App (Windows Presentation Foundation): For creating visually rich, modern Windows desktop applications using XAML for UI design. Offers more advanced UI capabilities than WinForms.
- ASP.NET Core Web App / API / Blazor: For building modern, cross-platform web applications, web APIs, or interactive web UIs using C#.
- Unit Test Project: For creating projects specifically designed to hold unit tests for your application code, often using frameworks like MSTest, NUnit, or xUnit.
CONSOLE APPLICATION STRUCTURE:
A basic C# Console App typically includes:
- `.csproj` file: The project file containing metadata, dependencies (like .NET SDK version), and build configurations.
- `Program.cs` file: The main source code file containing the entry point of the application – the `static void Main(string[] args)` method. Execution begins here.
// Using directive to access Console class
using System;

namespace MyConsoleApp // Namespace for organization
{
    class Program
    {
        // Entry point of the application
        static void Main(string[] args)
        {
            Console.WriteLine("Hello, World!");

            // You can access command-line arguments via the 'args' array
            if (args.Length > 0)
            {
                Console.WriteLine($"First argument: {args[0]}");
            }

            Console.ReadKey(); // Pause console before closing (optional)
        }
    }
}
WINDOWS FORMS APPLICATION PROJECT STRUCTURE:
A typical WinForms project adds UI-specific files:
- `.csproj` file: As before, defines project settings.
- `Program.cs`: Still the entry point, but usually just initializes and runs the main form.
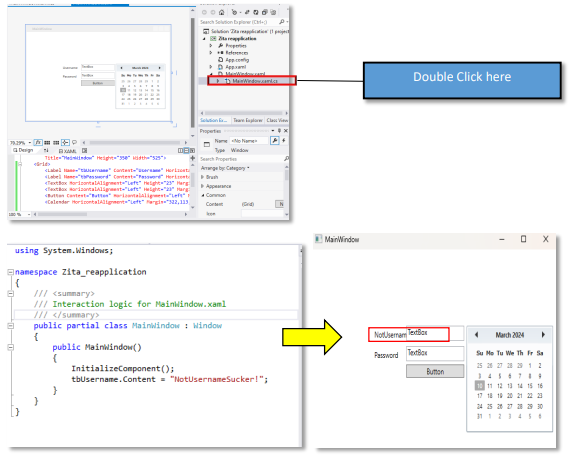
- `Form1.cs`: Code-behind file for the main form class (`Form1`). Contains event handlers and logic related to the form's controls.
- `Form1.Designer.cs`: **Auto-generated** code by the Visual Studio designer. Defines the controls placed on the form, their properties, and event subscriptions. **You should not manually edit this file.**
- `Form1.resx`: Resource file associated with the form, often storing things like localized strings or embedded images.
WPF APPLICATION PROJECT STRUCTURE:
WPF uses XAML for UI definition:
- `.csproj` file: Project settings.
- `App.xaml` / `App.xaml.cs`: Defines application-level resources, startup behavior, and handles application-wide events. `App.xaml` is the XAML definition, `App.xaml.cs` is the code-behind.
- `MainWindow.xaml`: XAML file defining the UI layout and elements of the main window.
- `MainWindow.xaml.cs`: Code-behind file for the `MainWindow` class. Contains logic and event handlers for the window and its controls.
Benefits of Using Project Types and Templates:
- Quick Start: Provides essential files and configuration.
- Best Practices: Often includes standard structure and necessary references.
- Focus: Lets you concentrate on application logic rather than boilerplate setup.
USING BREAKPOINTS AND STEPPING THROUGH CODE IN A DEBUGGER
Debugging is essential for finding and fixing errors. Visual Studio provides powerful debugging tools.
- BREAKPOINTS: Markers that pause program execution at a specific line.
- **Setting:** Click in the left margin next to the line number in the code editor, or press `F9`. A red dot appears.
- **Conditional Breakpoints:** Right-click a breakpoint to set conditions (e.g., pause only when `count > 10`).
- STEPPING THROUGH CODE: Once paused at a breakpoint:
- **Step Over (`F10`):** Executes the current line. If it's a method call, it executes the entire method without stepping into its details.
- **Step Into (`F11`):** Executes the current line. If it's a method call, the debugger *enters* that method, allowing you to debug it line by line.
- **Step Out (`Shift+F11`):** If you've stepped into a method, this executes the rest of the current method and returns to the line where it was called.
- **Continue (`F5`):** Resumes normal execution until the next breakpoint is hit or the program ends.
- INSPECTING VARIABLES: While paused:
- **Hover:** Hover the mouse cursor over a variable in the code editor to see its current value.
- **Locals Window:** Shows variables currently in scope within the current method.
- **Autos Window:** Shows variables used in the current and previous statements.
- **Watch Windows:** Add specific variables or expressions to monitor their values continuously.
- **Immediate Window:** Type variable names or expressions to evaluate them immediately.
- CALL STACK WINDOW: Shows the sequence of method calls that led to the current execution point. Useful for understanding how your program got to its current state.
TESTING C# PROGRAMS WITH UNIT TESTING FRAMEWORKS
Unit testing involves testing individual, isolated components (units, typically methods or classes) of your code to verify they work correctly.
Popular C# Frameworks:
- MSTest: Microsoft's built-in framework, well-integrated with Visual Studio.
- NUnit: A widely used, mature, open-source framework, originally ported from Java's JUnit.
- xUnit.net: A modern, open-source framework focused on simplicity and extensibility, popular in the .NET community.
AAA Pattern (Arrange, Act, Assert):
A common structure for unit tests:
- Arrange: Set up the necessary preconditions and inputs (e.g., create objects, initialize variables, configure mocks).
- Act: Execute the specific method or code unit being tested.
- Assert: Verify that the outcome of the action matches the expected result using assertion methods provided by the framework (e.g., `Assert.AreEqual`, `Assert.IsTrue`, `Assert.Throws`).
Writing Unit Tests (Example with xUnit):
using Xunit; // Add Xunit namespace

// Class containing the code to test
public class Calculator
{
    public int Add(int a, int b) { return a + b; }
}

// Test class
public class CalculatorTests
{
    [Fact] // Attribute marking this as a test method
    public void Add_TwoPositiveNumbers_ReturnsCorrectSum()
    {
        // Arrange: Set up the test
        var calculator = new Calculator();
        int number1 = 5;
        int number2 = 3;
        int expectedSum = 8;

        // Act: Perform the action to test
        int actualSum = calculator.Add(number1, number2);

        // Assert: Verify the result
        Assert.Equal(expectedSum, actualSum);
    }

    // Add more test methods for different scenarios (negatives, zero, etc.)
}
Running Unit Tests:
- Use the **Test Explorer** window in Visual Studio (`Test > Test Explorer`) to discover, run (all or selected), debug, and view the results of your tests.
Benefits of Unit Testing Frameworks:
- Verify code correctness.
- Facilitate refactoring with confidence.
- Improve code design (testable code is often better designed).
- Act as documentation.
- Enable automated testing in CI/CD pipelines.
MOCKING OBJECTS AND DEPENDENCIES WITH MOQ
When unit testing, you often want to isolate the class being tested from its external dependencies (like database connections, web services, or other complex classes). Mocking frameworks, like **Moq**, allow you to create "fake" or simulated versions of these dependencies.
Why Use Mocking?
- **Isolation:** Test the unit in isolation, without worrying about the behavior or state of real dependencies.
- **Control:** Define exactly how the dependency should behave during the test (e.g., what value a method should return, or if it should throw an exception).
- **Speed & Reliability:** Avoid slow or unreliable external calls (like network or database access) in your unit tests.
- **Testability:** Enables testing code that interacts with difficult-to-instantiate or configure dependencies.
Moq Framework:
- A popular, open-source mocking library for .NET.
- Uses a fluent API (method chaining) and lambda expressions for easy setup.
- Typically mocks interfaces or virtual members of classes.
- Install via NuGet Package Manager: `Install-Package Moq`
Mocking Example with Moq:
Scenario: Testing a `OrderProcessor` that depends on an `IEmailService` to send notifications.
using Moq;         // Add Moq namespace
using Xunit;

// Interfaces/Classes being tested/mocked
public interface IEmailService
{
    void SendOrderConfirmation(int orderId);
}

public class OrderProcessor
{
    private readonly IEmailService _emailService;

    public OrderProcessor(IEmailService emailService)
    {
        _emailService = emailService;
    }

    public void ProcessOrder(int orderId)
    {
        // ... processing logic ...
        _emailService.SendOrderConfirmation(orderId); // Call the dependency
    }
}

// Test Class
public class OrderProcessorTests
{
    [Fact]
    public void ProcessOrder_CallsEmailService()
    {
        // Arrange: Create a mock of the dependency
        var mockEmailService = new Mock<IEmailService>();
        int testOrderId = 123;

        // Setup the mock (optional, needed if the method returns something or has complex logic)
        // mockEmailService.Setup(service => service.SendOrderConfirmation(testOrderId)); // Basic setup if needed

        // Inject the mock object into the class under test
        var orderProcessor = new OrderProcessor(mockEmailService.Object);

        // Act: Call the method being tested
        orderProcessor.ProcessOrder(testOrderId);

        // Assert: Verify that the mock's method was called as expected
        mockEmailService.Verify(
            service => service.SendOrderConfirmation(testOrderId),
            Times.Once() // Ensure it was called exactly once
        );
    }
}
Key Moq parts: `new Mock
TEST-DRIVEN DEVELOPMENT (TDD) IN C#
Test-Driven Development (TDD) is an iterative software development process where tests are written *before* the production code.
TDD Workflow (Red-Green-Refactor):
- Red: Write a failing unit test that defines a desired improvement or new function. The test should fail because the code doesn't exist or isn't implemented correctly yet.
- Green: Write the minimum amount of production code necessary to make the failing test pass. Focus solely on passing the test, even if the code isn't perfect.
- Refactor: Improve the production code (and potentially the test code) by removing duplication, improving clarity, and optimizing performance, ensuring all tests still pass after refactoring.
Benefits of TDD:
- Design Guidance: Writing tests first forces you to think about how the code will be used and encourages better, more testable designs.
- Safety Net: Provides a suite of tests that verify functionality, giving confidence when refactoring or adding new features.
- Early Bug Detection: Catches bugs immediately as code is written.
- Documentation: Tests serve as executable documentation for the code's behavior.
- Reduces Debugging Time: Failures point directly to the recently added/changed code.
Challenges of TDD:
- Learning Curve: Requires discipline and a shift in thinking.
- Mocking Complexity: Can require extensive use of mocking for dependencies.
- Test Maintenance: Tests need to be maintained alongside the production code.
- Initial Pace: Might feel slower initially compared to writing code first.
TDD, combined with unit testing frameworks and mocking, is a powerful methodology for building high-quality, reliable, and maintainable C# applications.